How to Set Up Atari Joysticks & Paddles in RetroArch with the Duo Ultimate H1 USB Adapter (Windows)
Setup Guide
A friendly, step-by-step walkthrough for Windows. By the end, your classic Atari joysticks and paddles will play smoothly in RetroArch — including up to four paddle players.
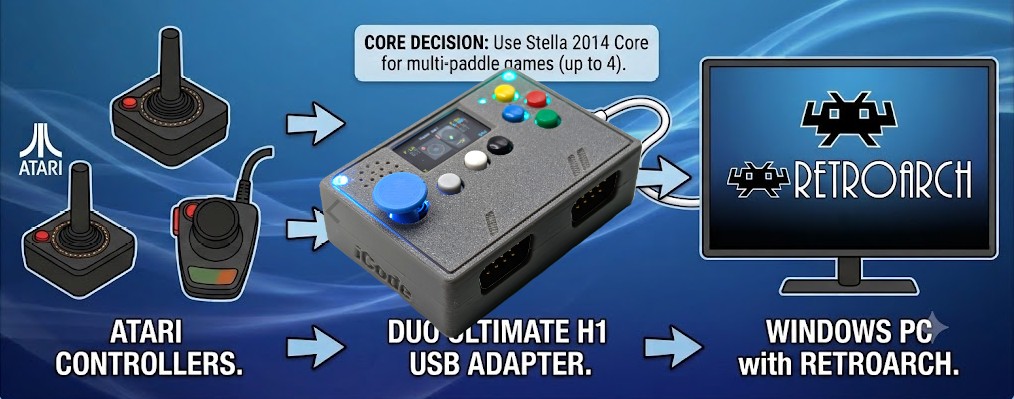
The Duo Ultimate H1 is a USB adapter that lets you plug real Atari joysticks and paddles into your PC. RetroArch can then use them to play Atari 2600 games. This guide covers the whole process from plugging in to saving your settings, and it’s written for beginners — no prior RetroArch experience needed.
- A Windows PC with RetroArch installed (this guide uses version
1.21.0) - The Duo Ultimate H1 USB adapter
- Your Atari joystick(s) and/or paddle(s)
- The Stella 2014 core installed in RetroArch (see the note below)
- Your Atari 2600 game files
For paddles, use the Stella 2014 core — not the regular Stella core. Stella 2014 supports full 4-player paddles. The regular Stella core currently has a bug that limits it to 1-player paddles.
Leave the Duo Ultimate on its default mode: Stick + Paddles, Left Analog. Since we’re playing Atari games with Atari paddles, keep any mouse option on standby or off.
1. Connect the adapter (order matters)
The Duo Ultimate is detected most reliably if you start it in this order:
- Start RetroArch first, while the Duo Ultimate is still powered off.
- Now power on the Duo Ultimate. RetroArch should detect it automatically. You’ll usually see a couple of small notifications float up from the bottom of the screen — typically “PS3 Controller 1” and “PS3 Controller 2.” Those are the adapter’s two ports (two players), and it’s a good sign.
Don’t worry if you don’t see the pop-ups — we’ll verify everything by hand in the next steps.
Why “PS3 Controller”? Windows recognizes the Duo Ultimate as a PS3-style gamepad — that’s just its default emulation mode. It behaves like an ordinary game controller plugged into your PC.
2. Set up Player 1 (Port 1) in RetroArch
First we’ll tell RetroArch which physical controller is Player 1 and teach it which buttons do what.
Open the input binds
From the RetroArch main menu, go to the top-level Settings menu → Input → RetroPad Binds.
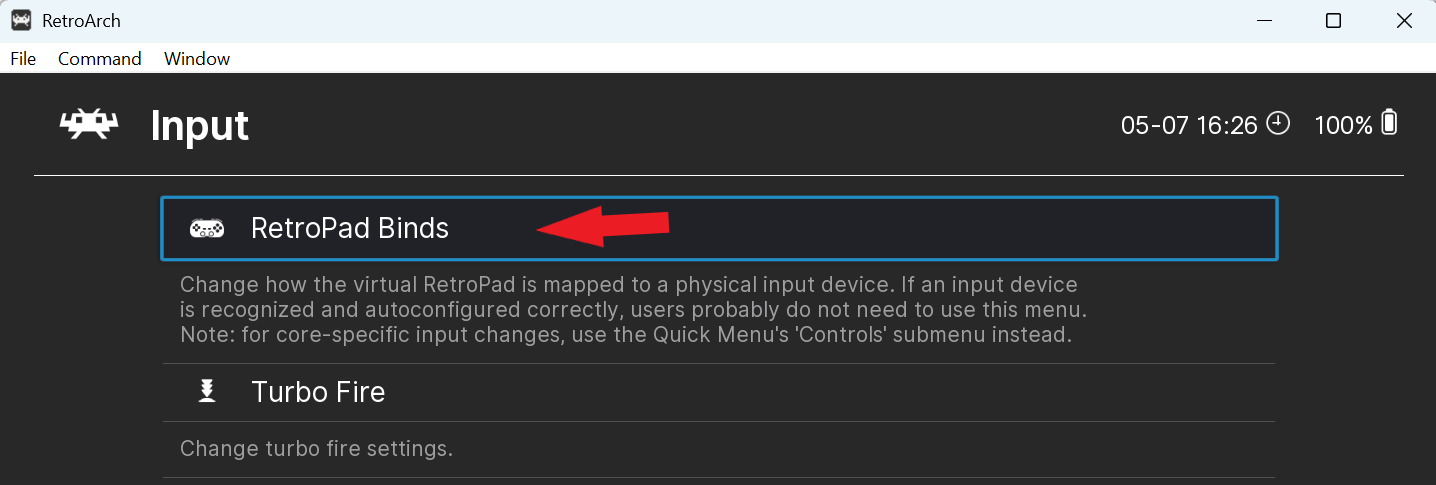
Inside RetroPad Binds you’ll see Port 1 Controls, Port 2 Controls, and so on. Each port is a player: Port 1 = Player 1, Port 2 = Player 2.
Point Port 1 at the adapter, and keep it analog
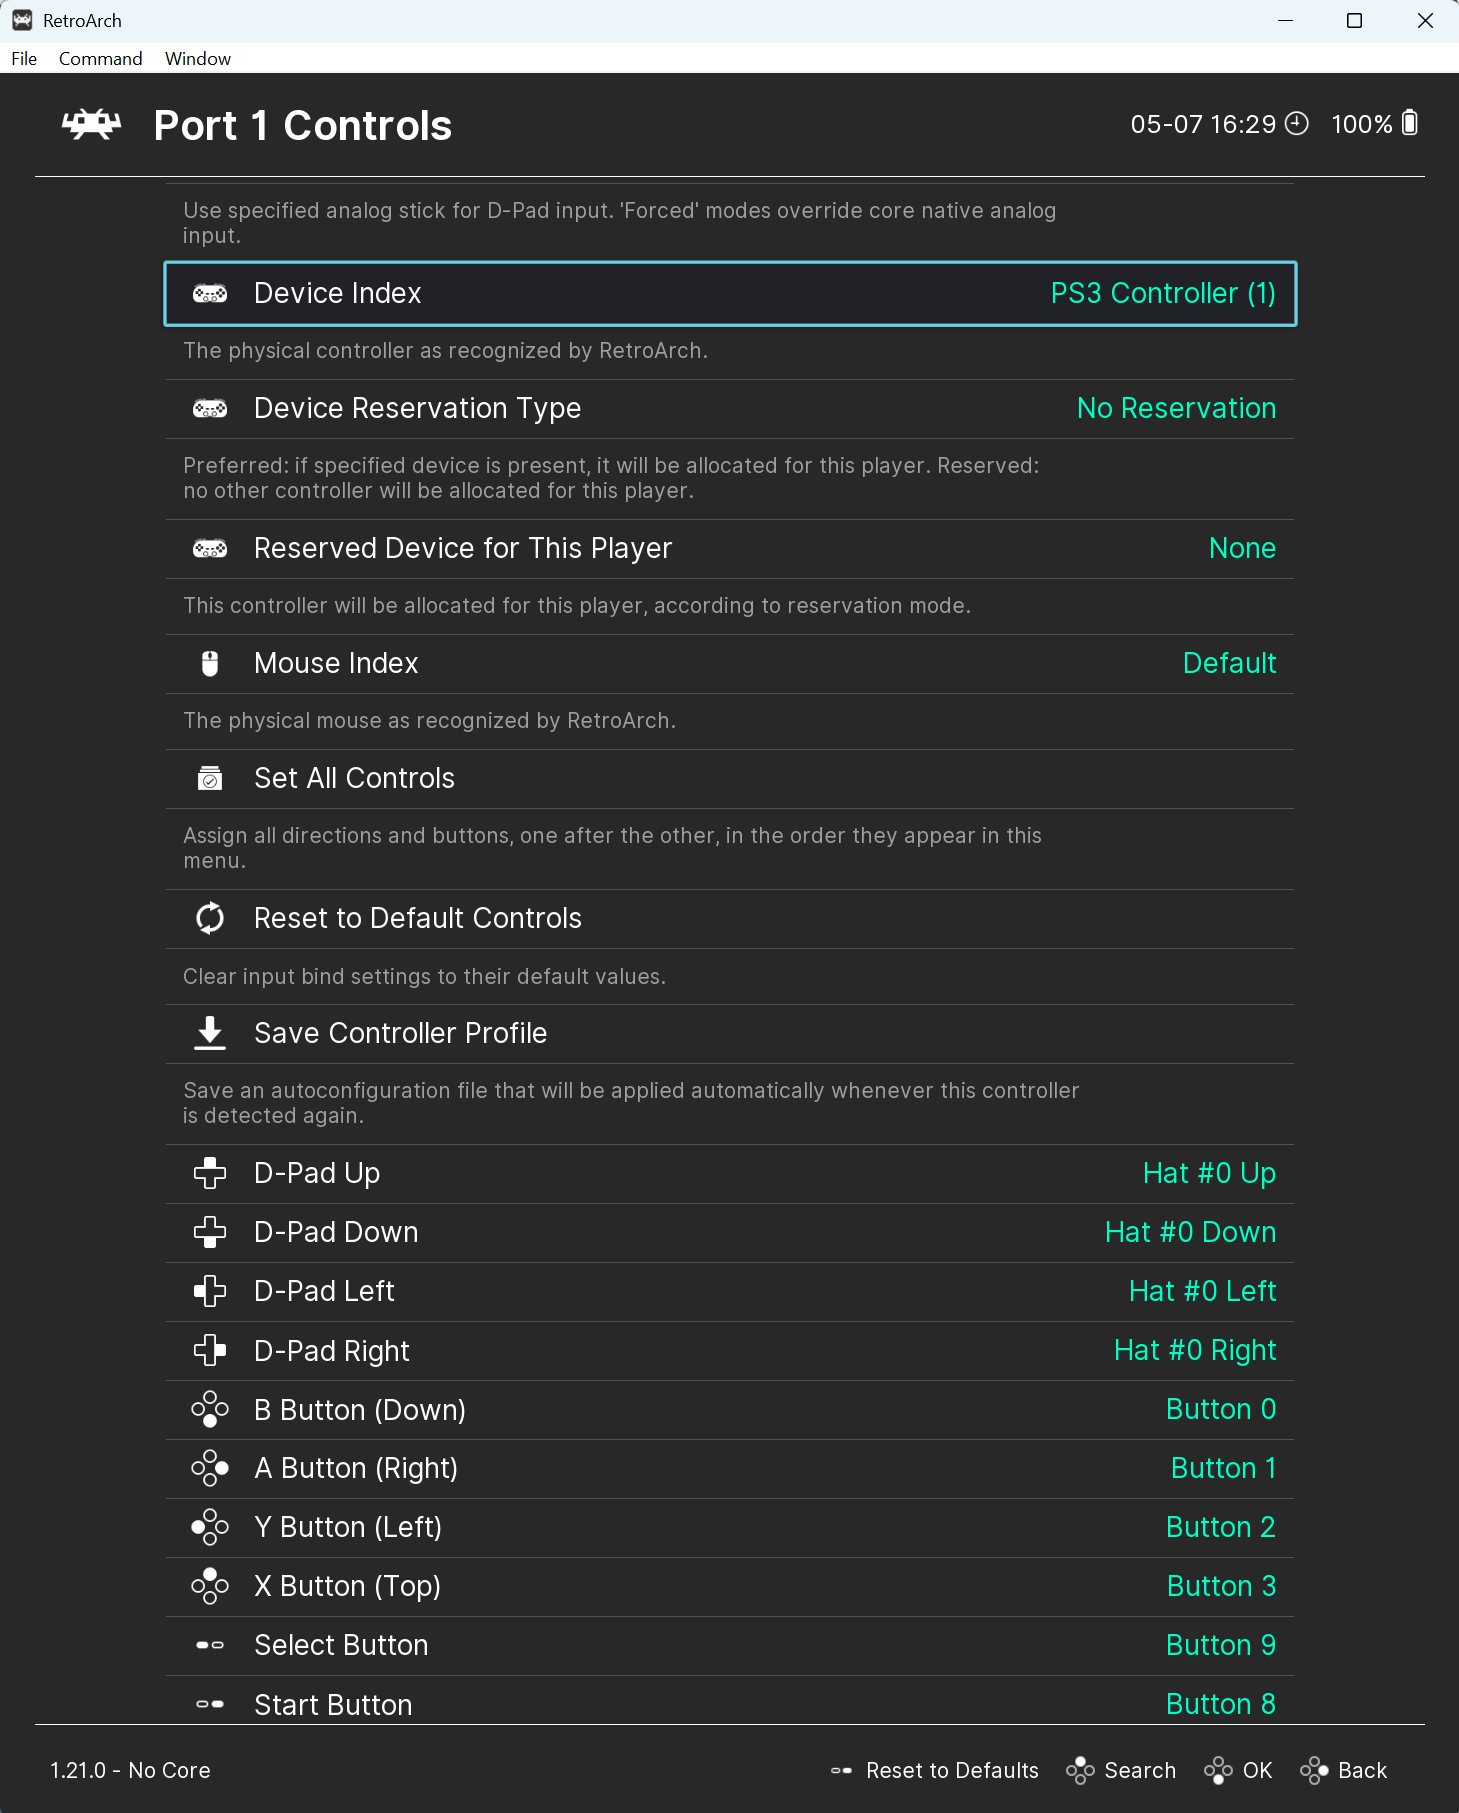
Open Port 1 Controls and check two settings near the top:
- Device Index should read
PS3 Controller (1). It’s usually set automatically. If it isn’t, press Enter on Device Index and pickPS3 Controller (1)from the list. - Analog to Digital Type should be
None. This keeps your input as true analog — essential for paddles, which need smooth, continuous left-and-right motion rather than being chopped into digital left/right.
PS3 Controller (1).Map the buttons
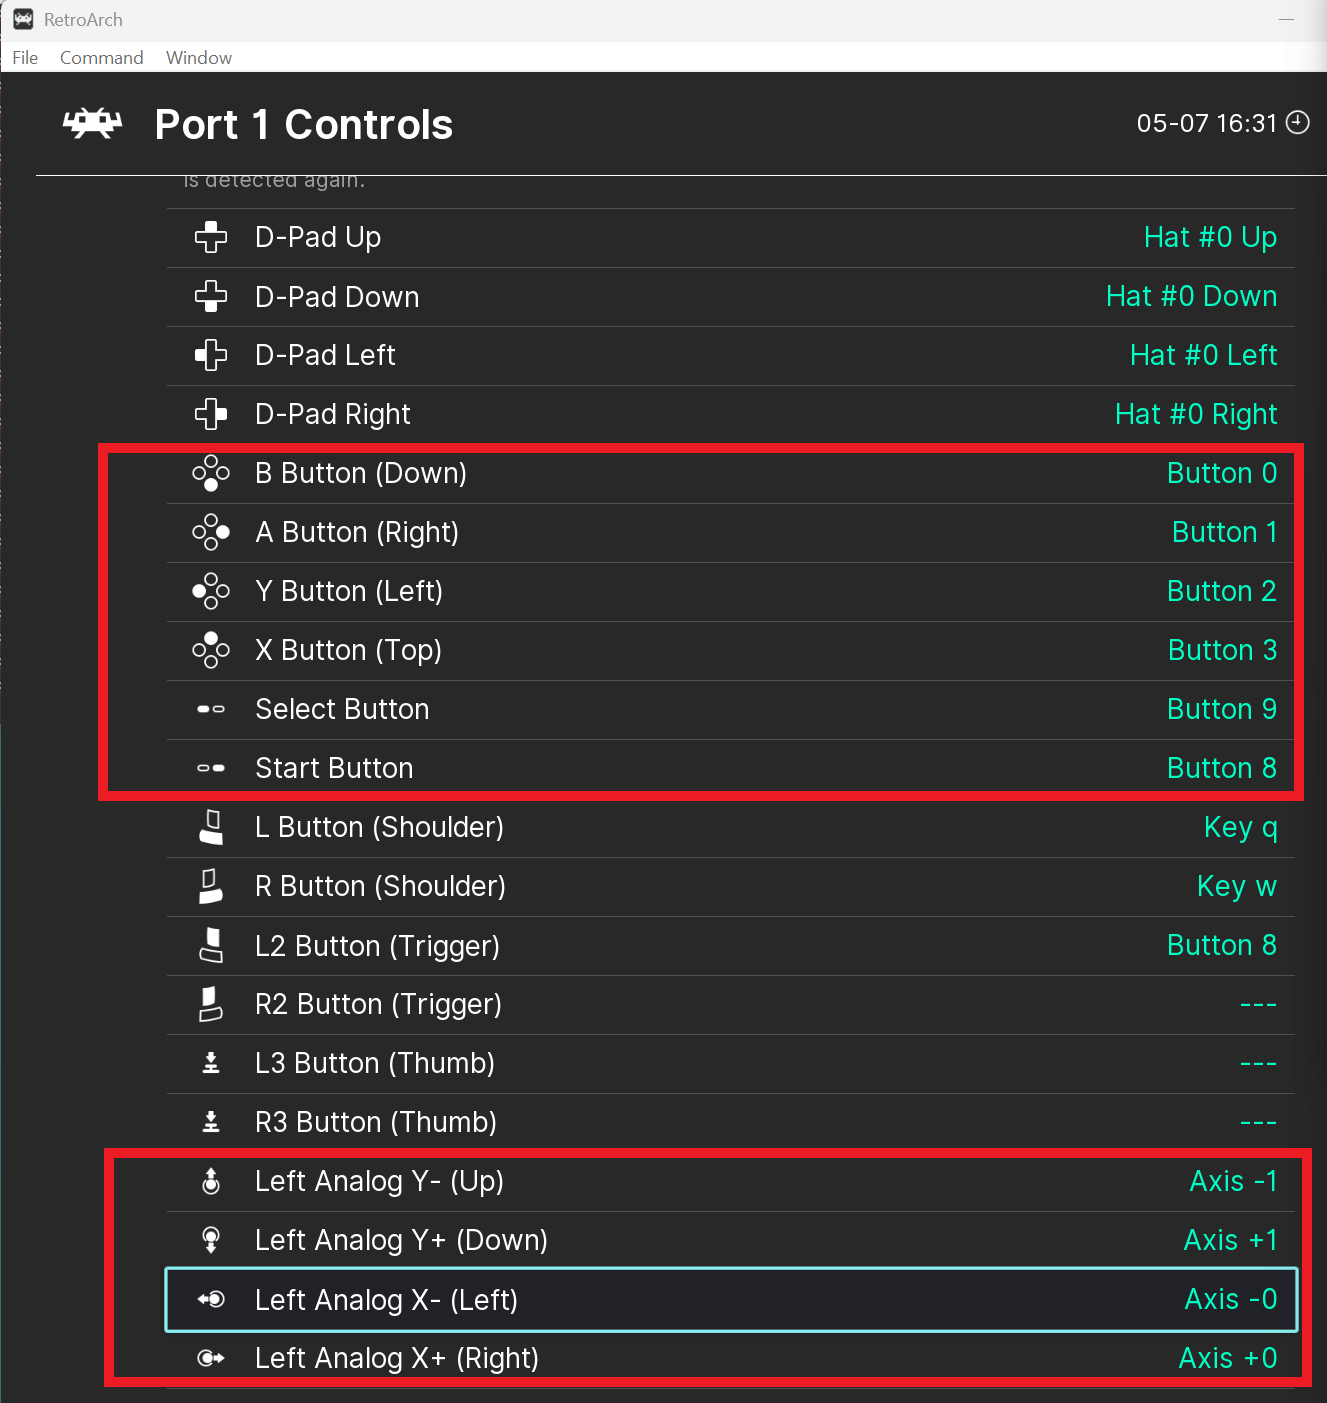
Scroll down past Device Index to the list of buttons (D-Pad Up, B Button, and so on). Leave the D-Pad on its defaults. To set a button, select it and press Enter — RetroArch gives you about 2 seconds to press the button you want before it times out, so press and hold the button on the Duo until it registers.
Map these six:
| RetroArch button | Press & hold on the Duo | Should show |
|---|---|---|
| B Button | Red | Button 0 |
| A Button | Green | Button 1 |
| Y Button | Blue | Button 2 |
| X Button | Yellow | Button 3 |
| Select | White | Button 9 |
| Start | Black | Button 8 |
On some units the red and green buttons appear reversed. The reliable rule is to match by button number: B Button = Button 0 and A Button = Button 1. If your colors don’t match the table, trust the button number shown on screen.
Map the joystick directions
Keep scrolling to the Left Analog entries and move your joystick in each direction to bind it. These come out as axes:
| RetroArch bind | Move joystick | Should show |
|---|---|---|
| Left Analog Y- (Up) | Up | Axis -1 |
| Left Analog Y+ (Down) | Down | Axis +1 |
| Left Analog X- (Left) | Left | Axis -0 |
| Left Analog X+ (Right) | Right | Axis +0 |
3. Set up Player 2 (Port 2)
Set up Port 2 Controls the same way you did Port 1, with one difference:
- Device Index must be
PS3 Controller (2)— the number (2), not (1). - Analog to Digital Type =
None, same as before. - Map the buttons and joystick directions just like Port 1 — except you can skip Select and Start. On the Duo Ultimate, the Start and Select buttons live on Port 1 only, so they don’t matter for Port 2.
Make sure Port 1 and Port 2 use different device indexes. If both are set to PS3 Controller (1), the two players share one physical port and it won’t work.
4. Turn on paddles in Stella 2014
The steps above cover joysticks. Paddles need one more layer of setup inside a game, using the Stella 2014 core.
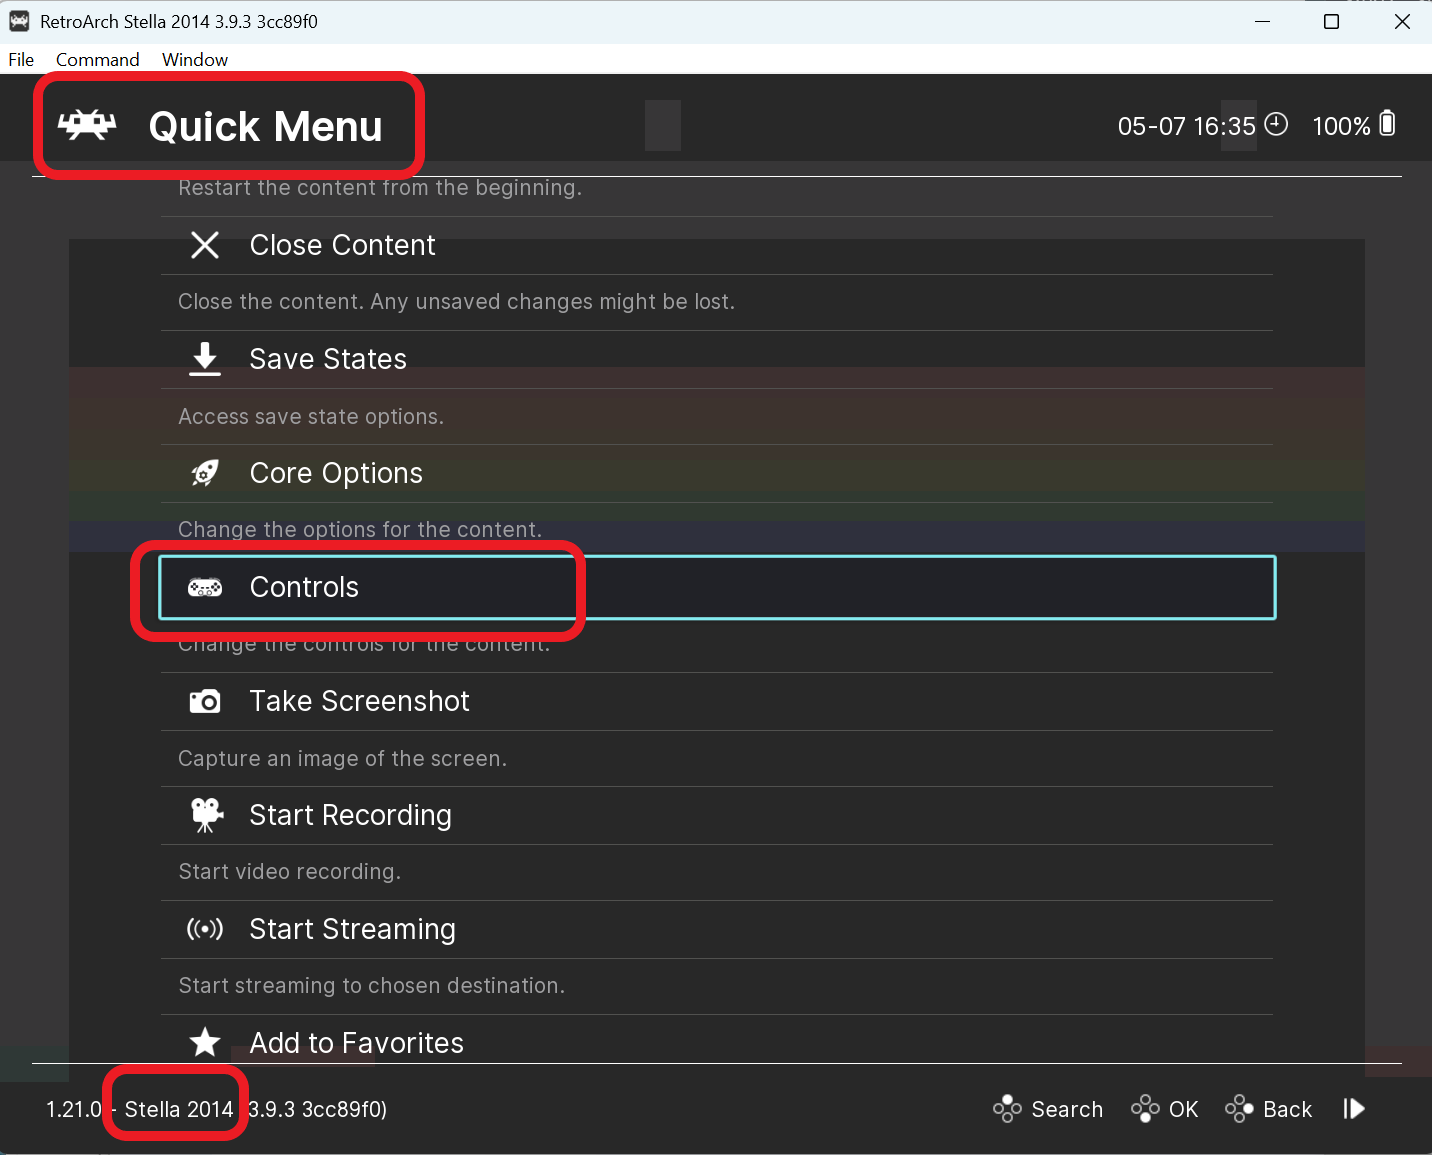
- Load an Atari 2600 game (for example, Breakout) using the Stella 2014 core, then press F1 to open the RetroArch Quick Menu.
- Choose Controls.
Port 1 → Players 1 & 2
Open Port 1 Controls and set Device Type to Paddles (Stelladaptor). RetroArch relabels the controls to paddle functions. Confirm:
- B Button →
P1 Fire - A Button →
P2 Fire
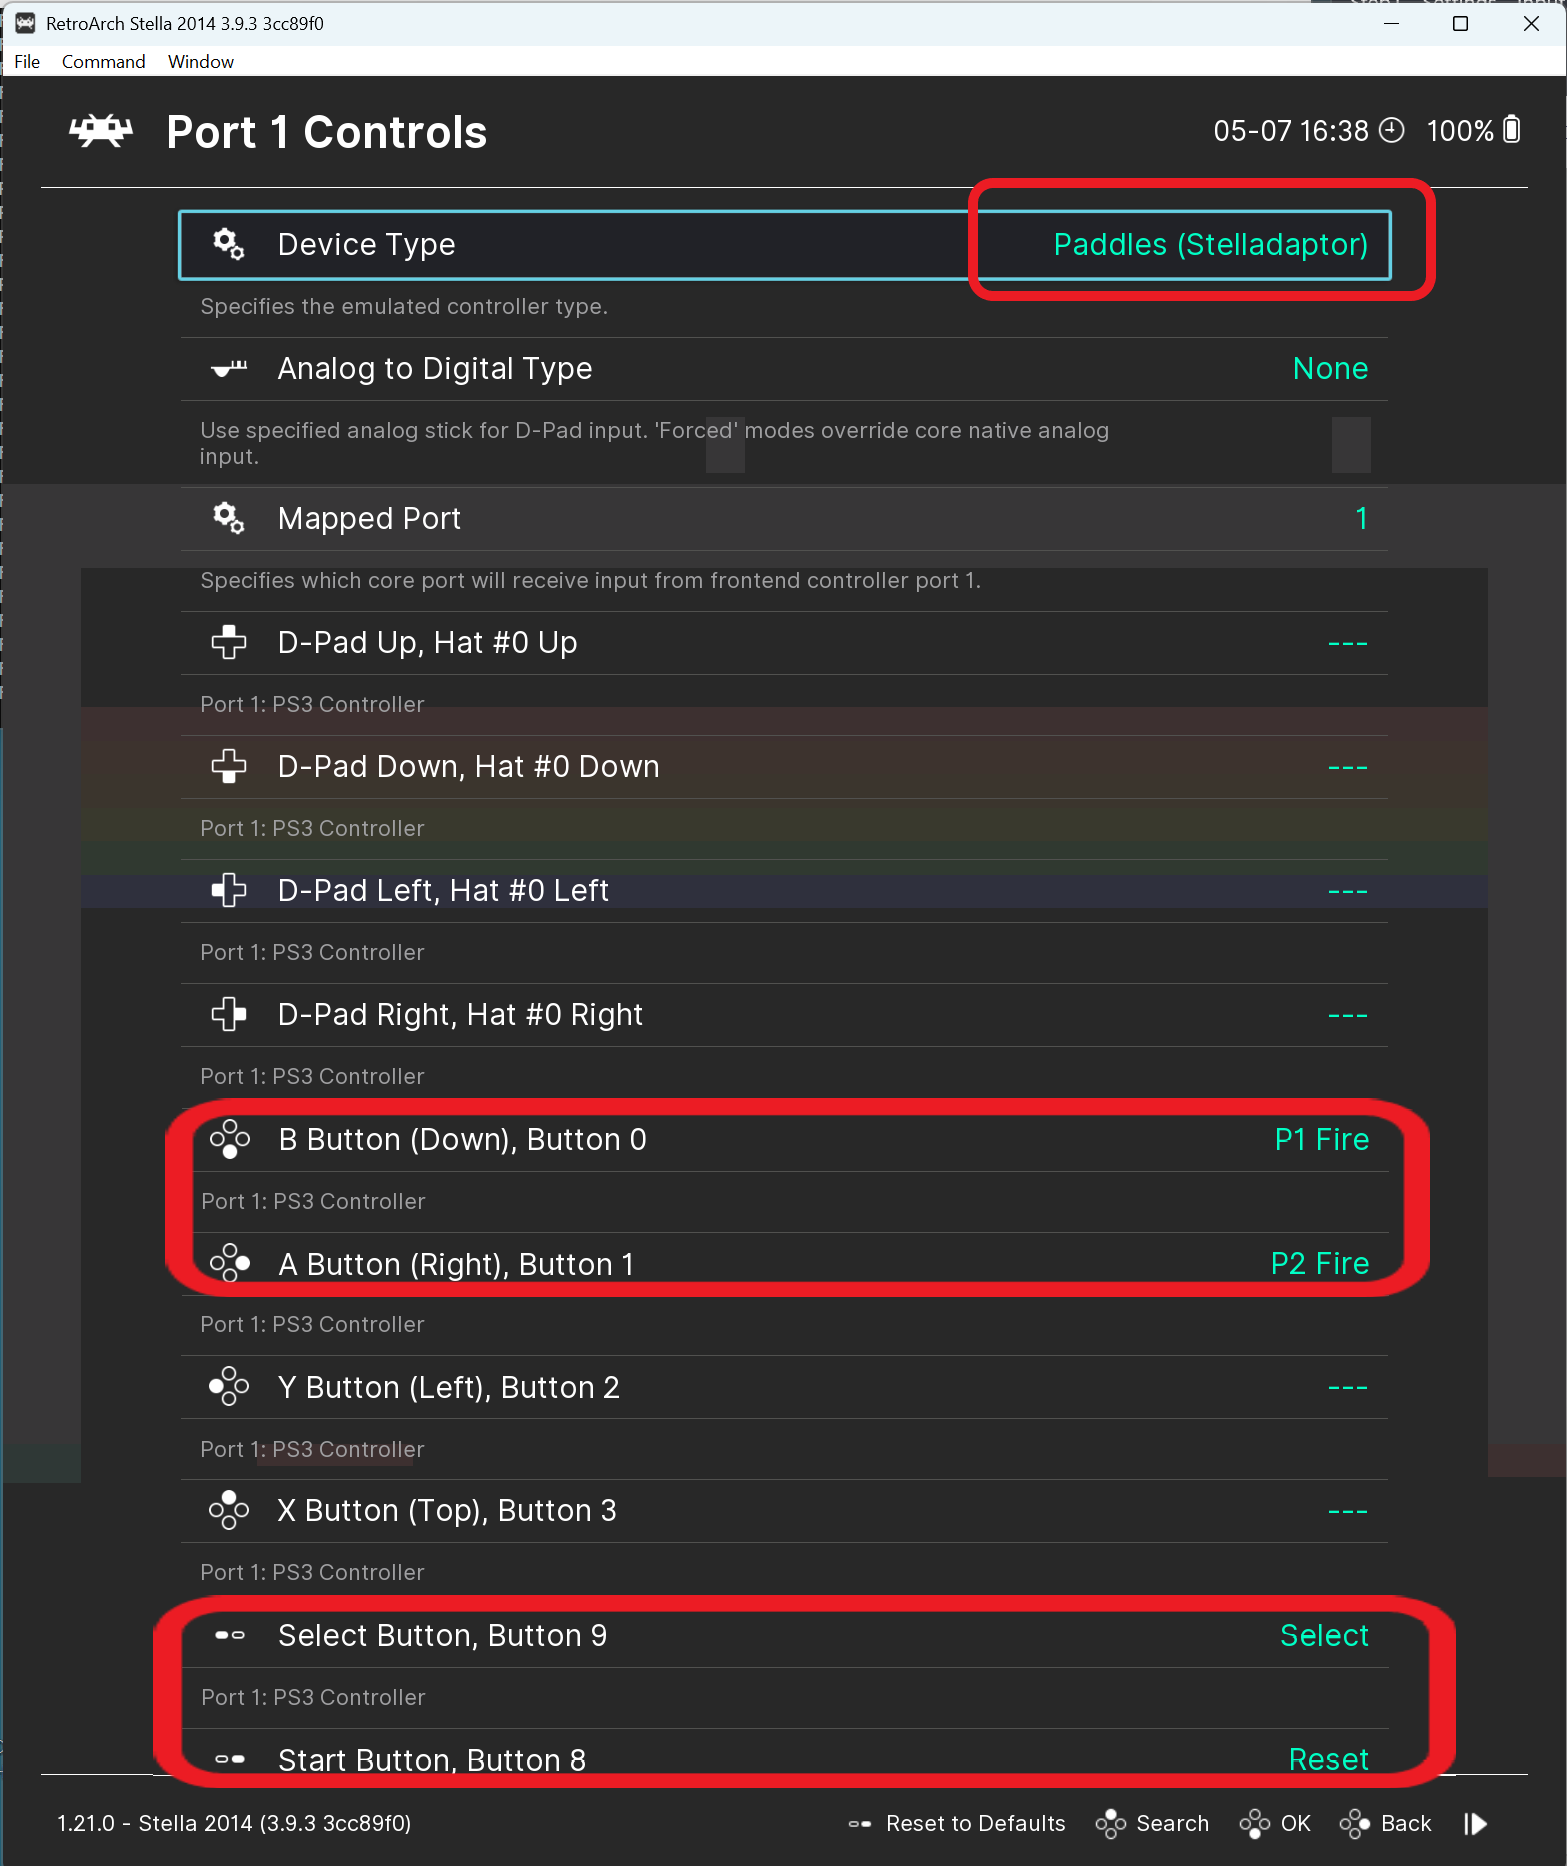
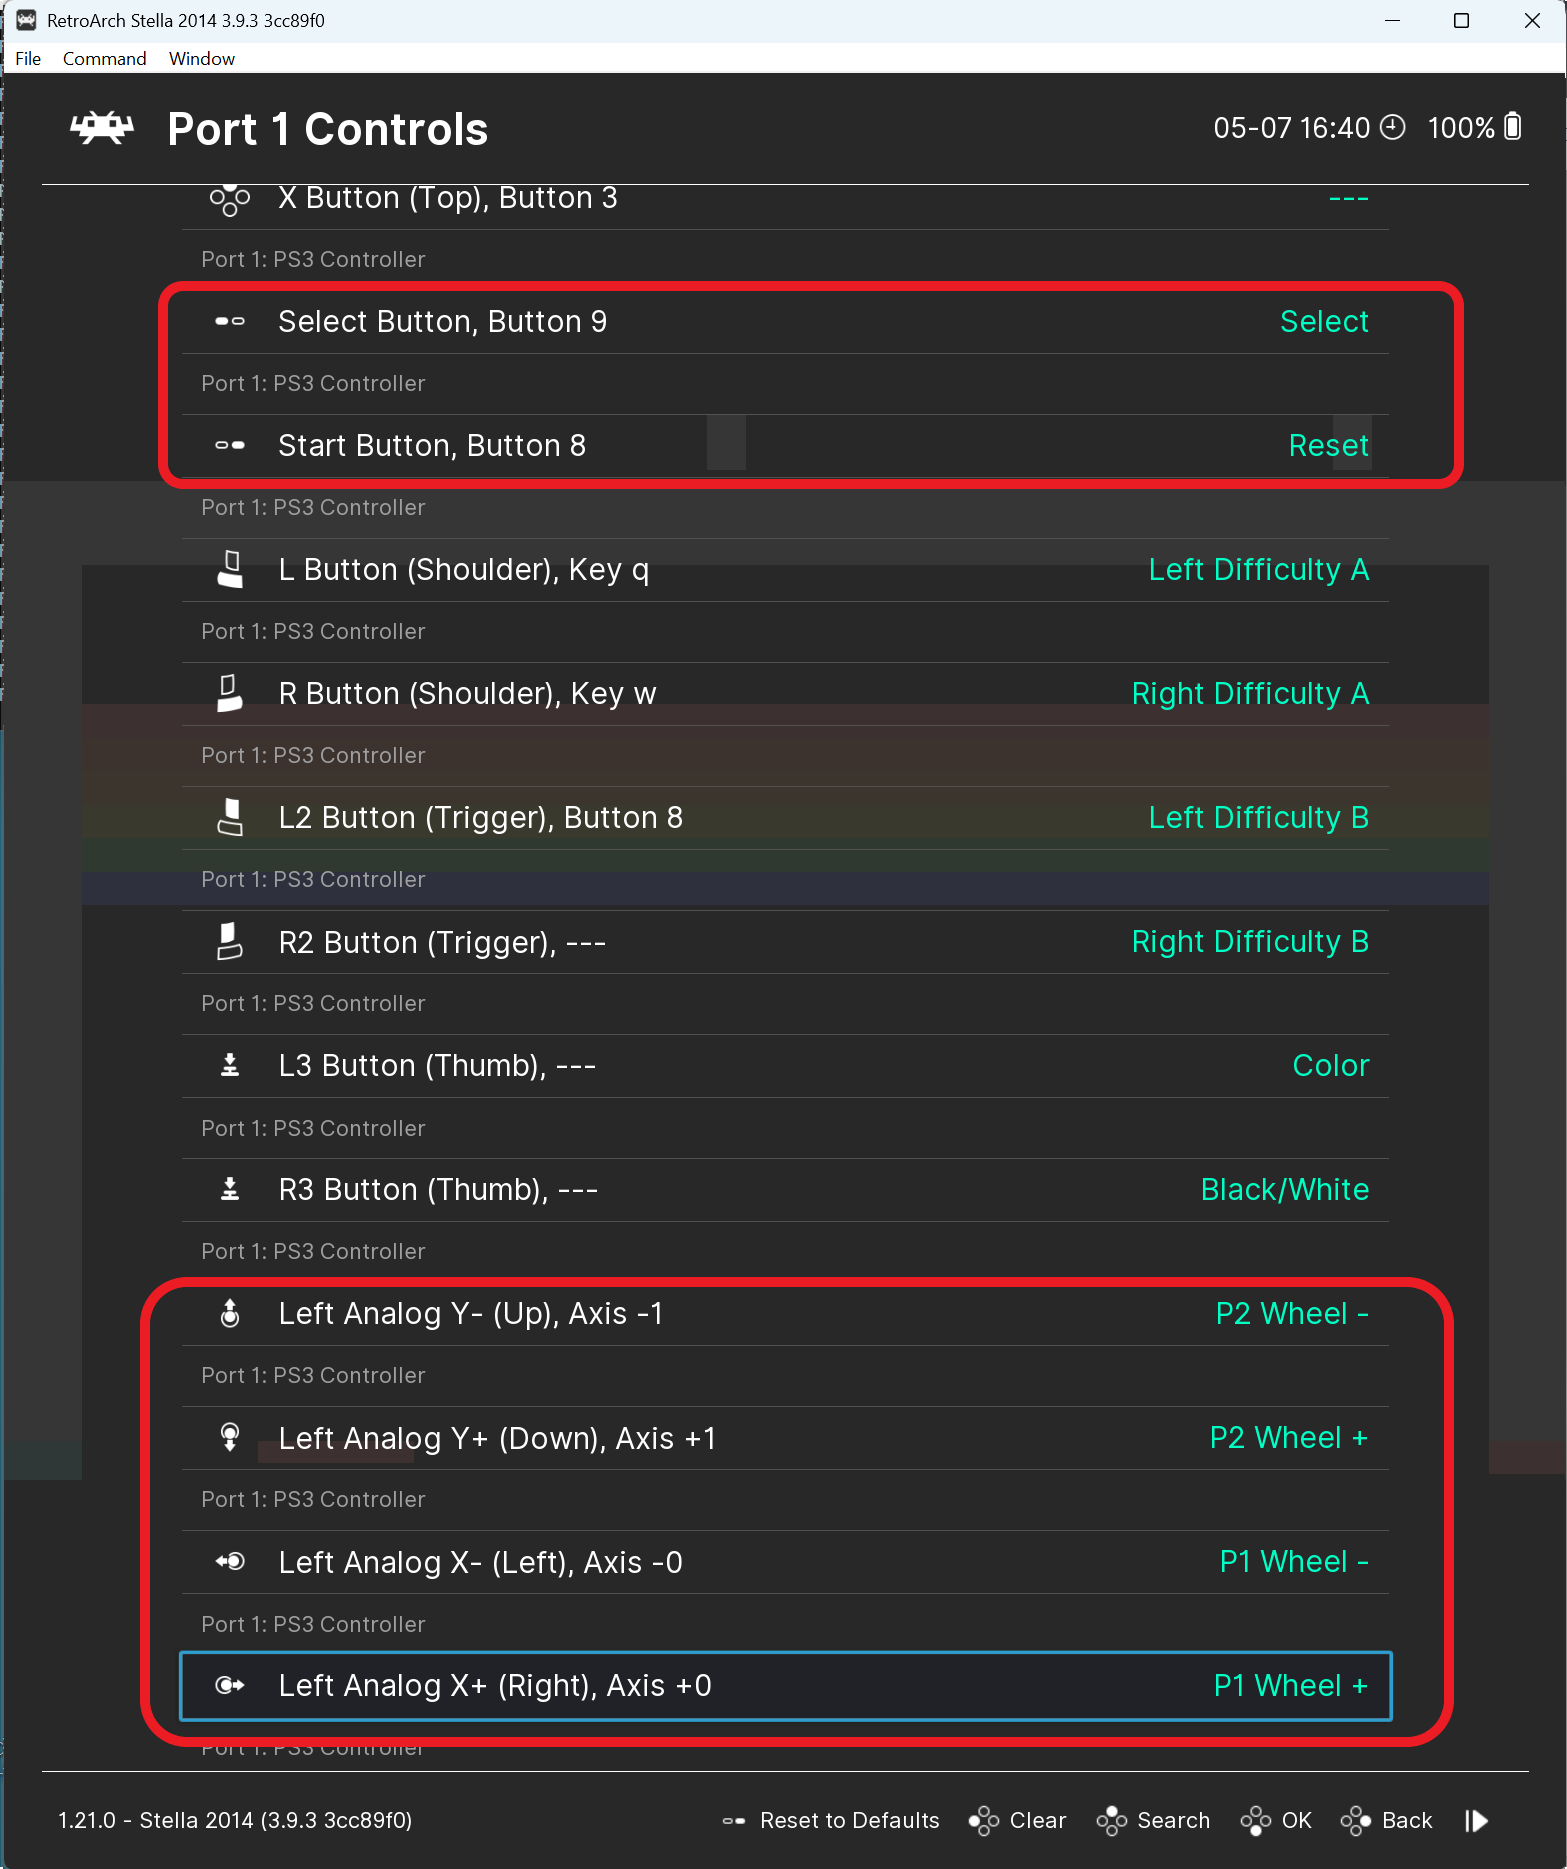
Paddles (Stelladaptor); B = P1 Fire, A = P2 Fire.The paddle dials (the twist knobs) come from the Left Analog stick automatically: the X axis is Player 1’s paddle and the Y axis is Player 2’s paddle. So Port 1 alone gives you two paddle players.
Port 2 → Players 3 & 4
For four-player paddle games, open Port 2 Controls, set Device Type to Paddles (Stelladaptor), and confirm:
- B Button →
P3 Fire - A Button →
P4 Fire
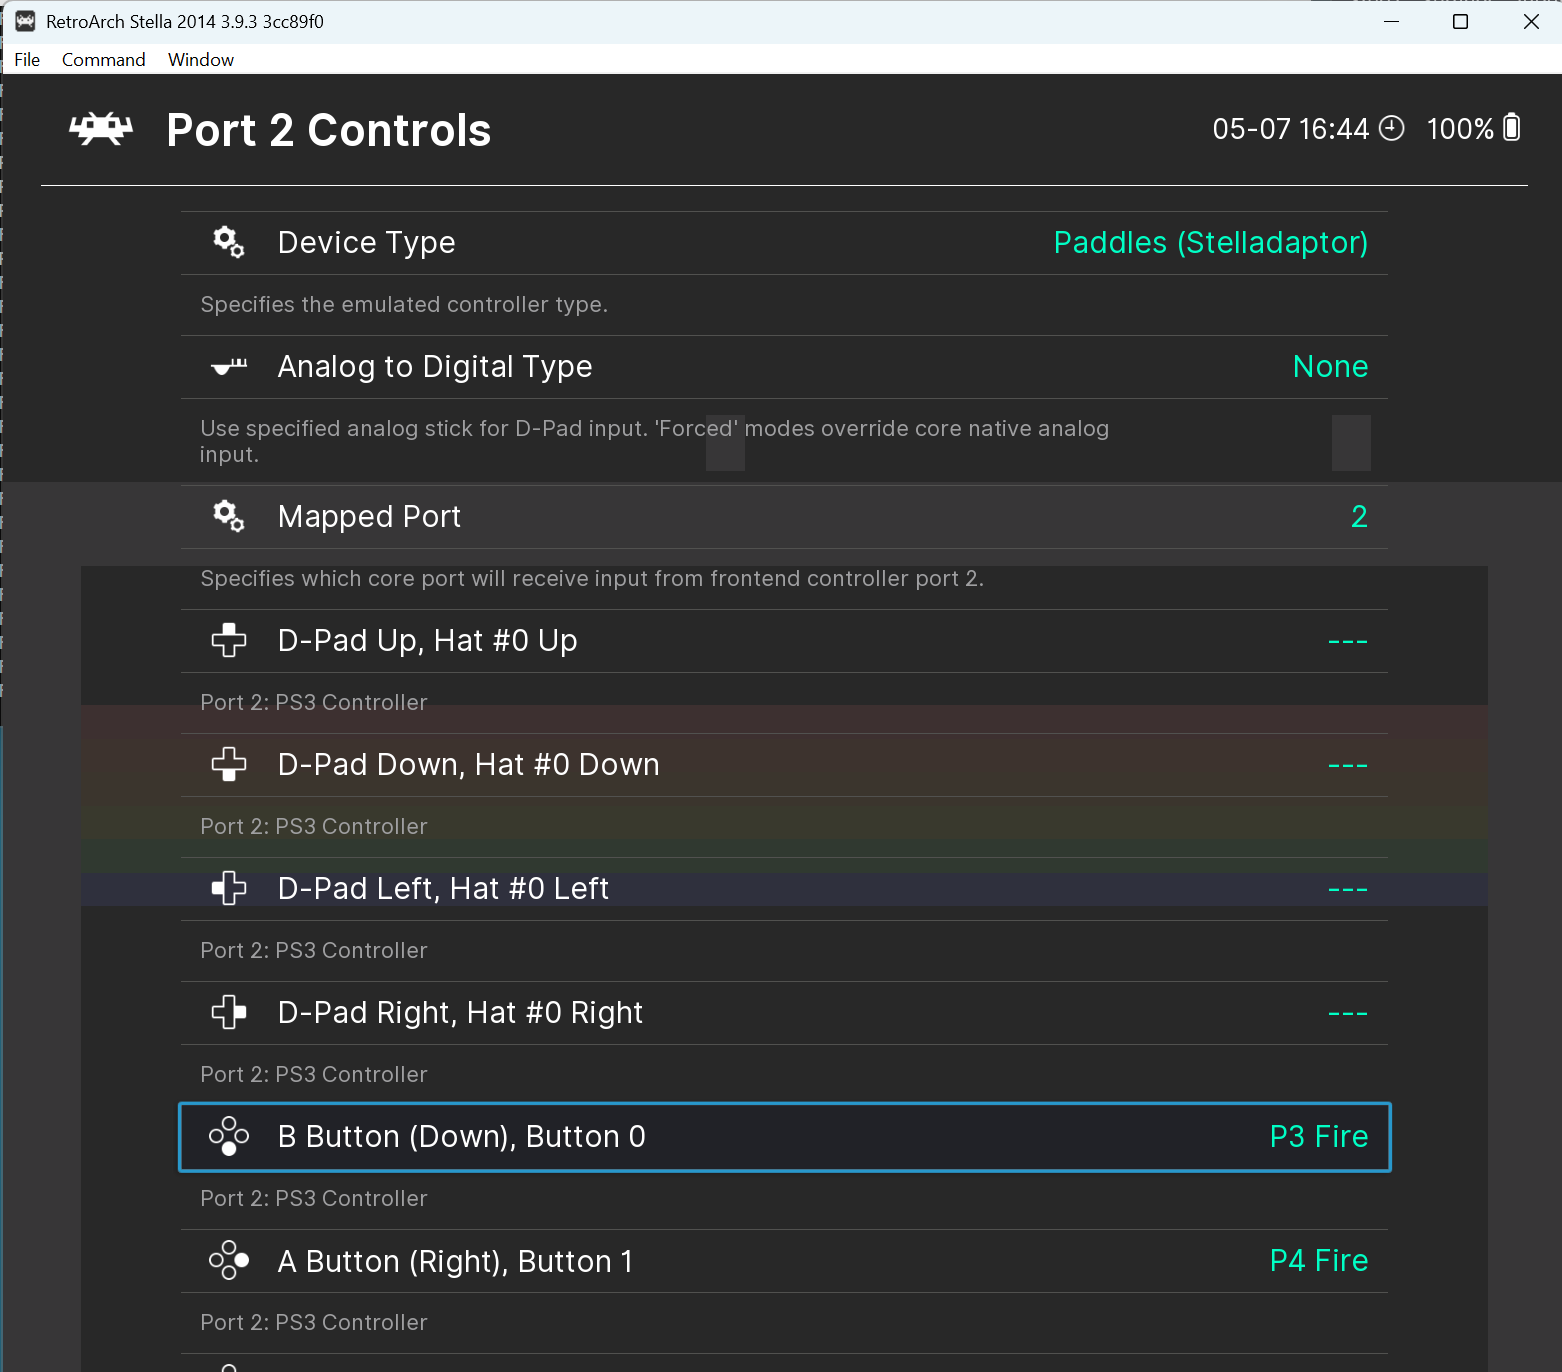
Paddles (Stelladaptor); B = P3 Fire, A = P4 Fire.As with Port 1, the paddle dials come from the analog axes: X = Player 3, Y = Player 4.
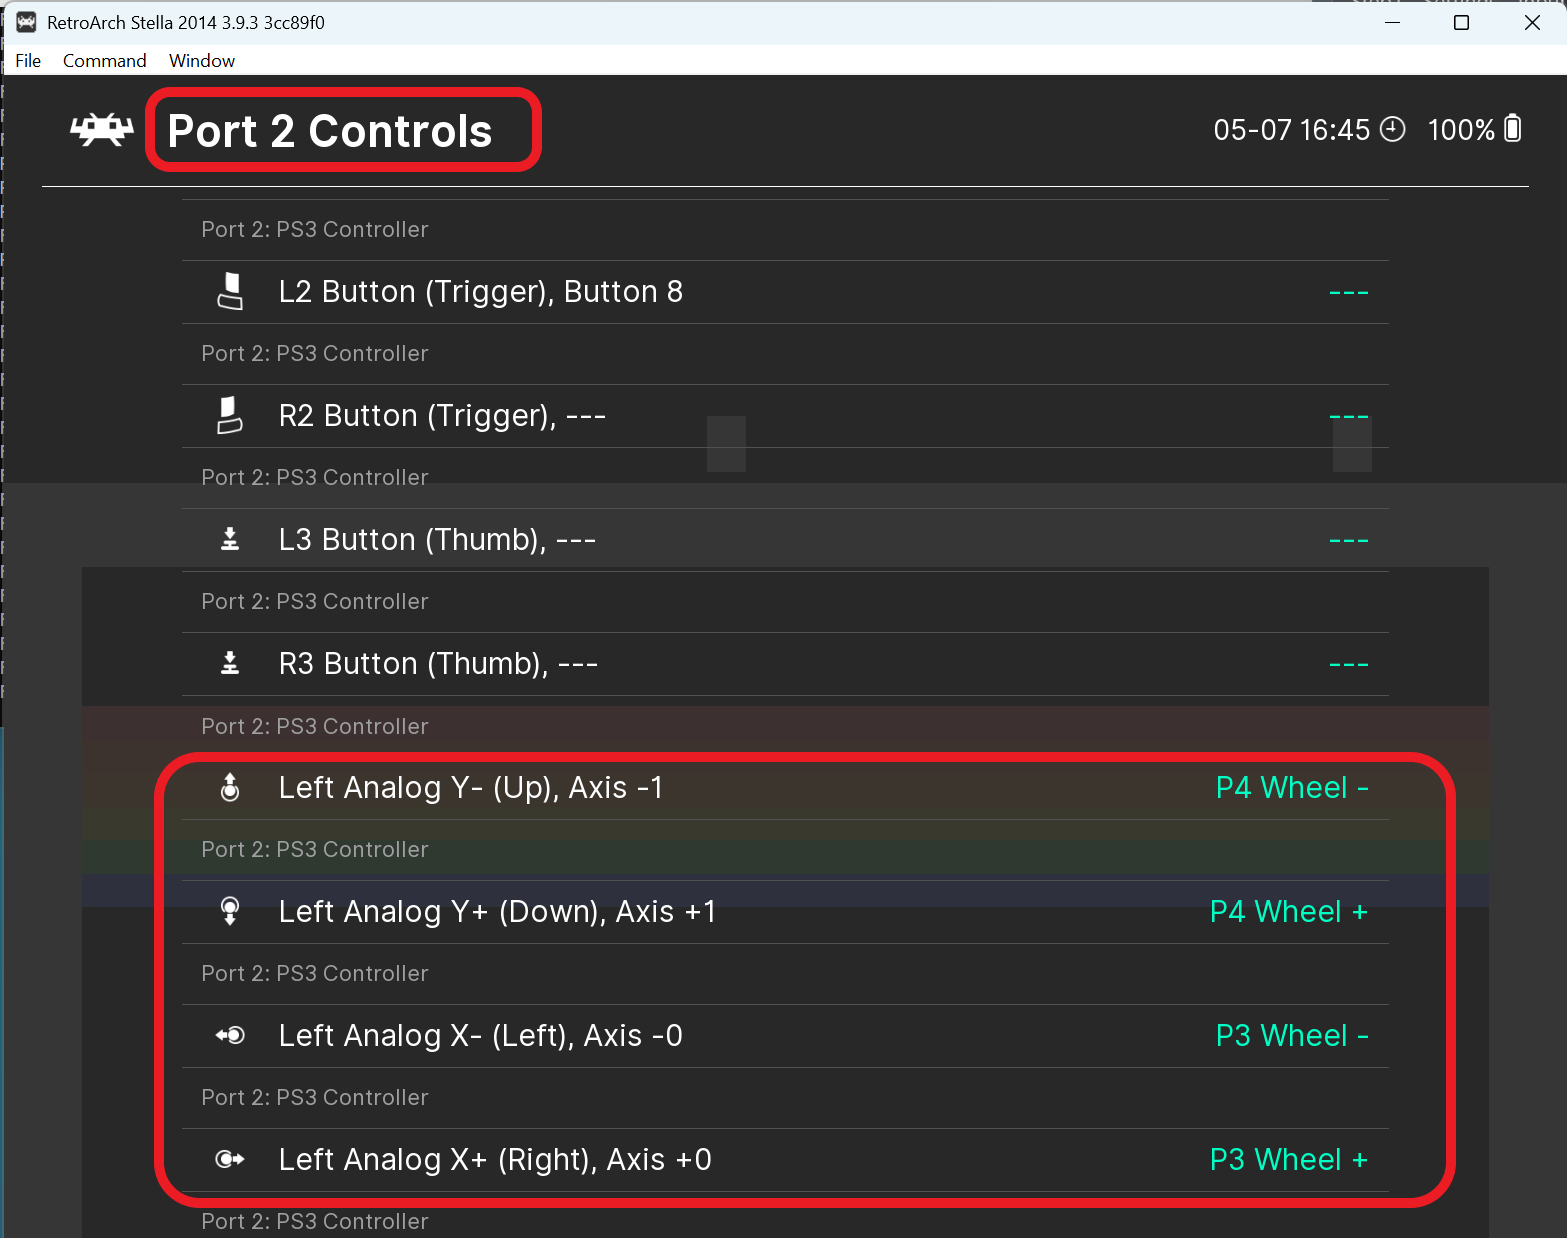
5. Save your settings so you only do this once
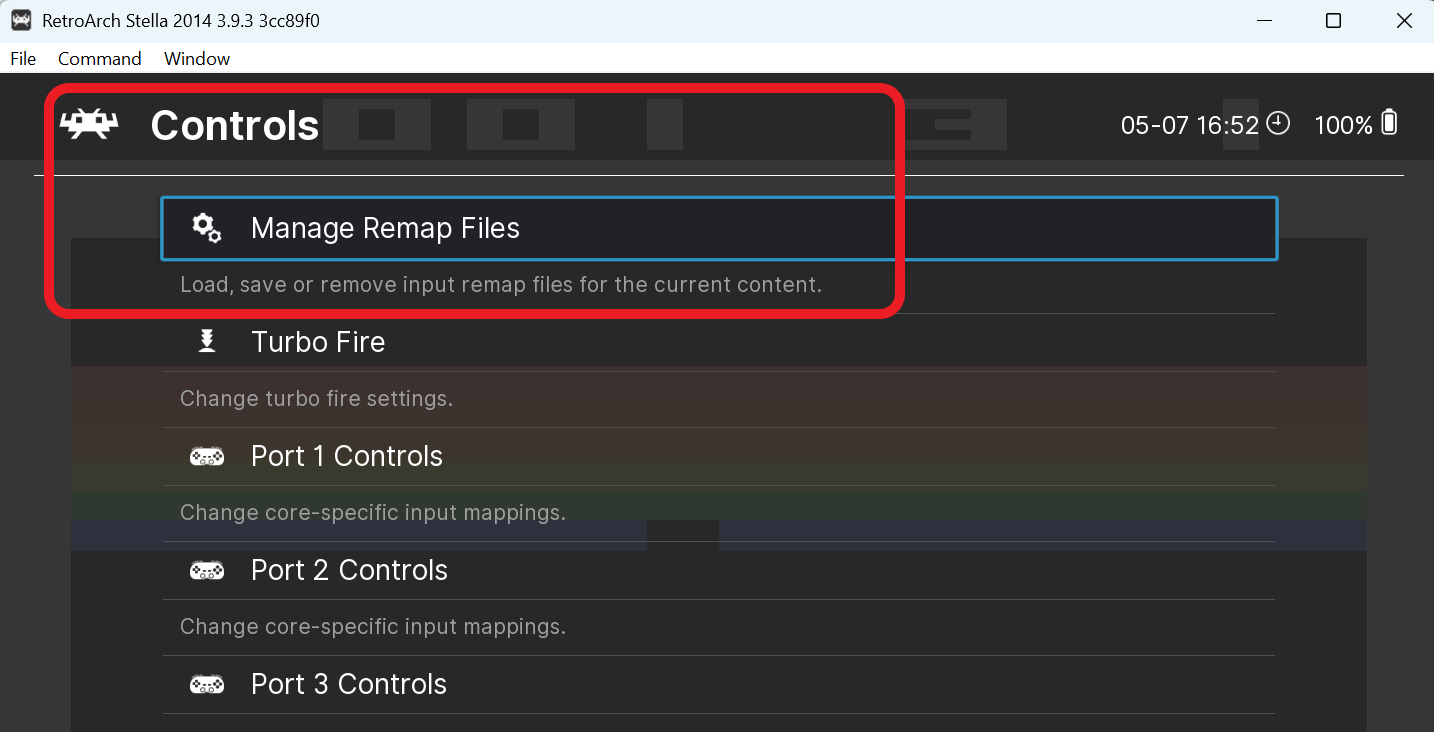
To avoid redoing the paddle setup for every game, save it as a core remap. Still in the Controls menu, choose Manage Remap Files.
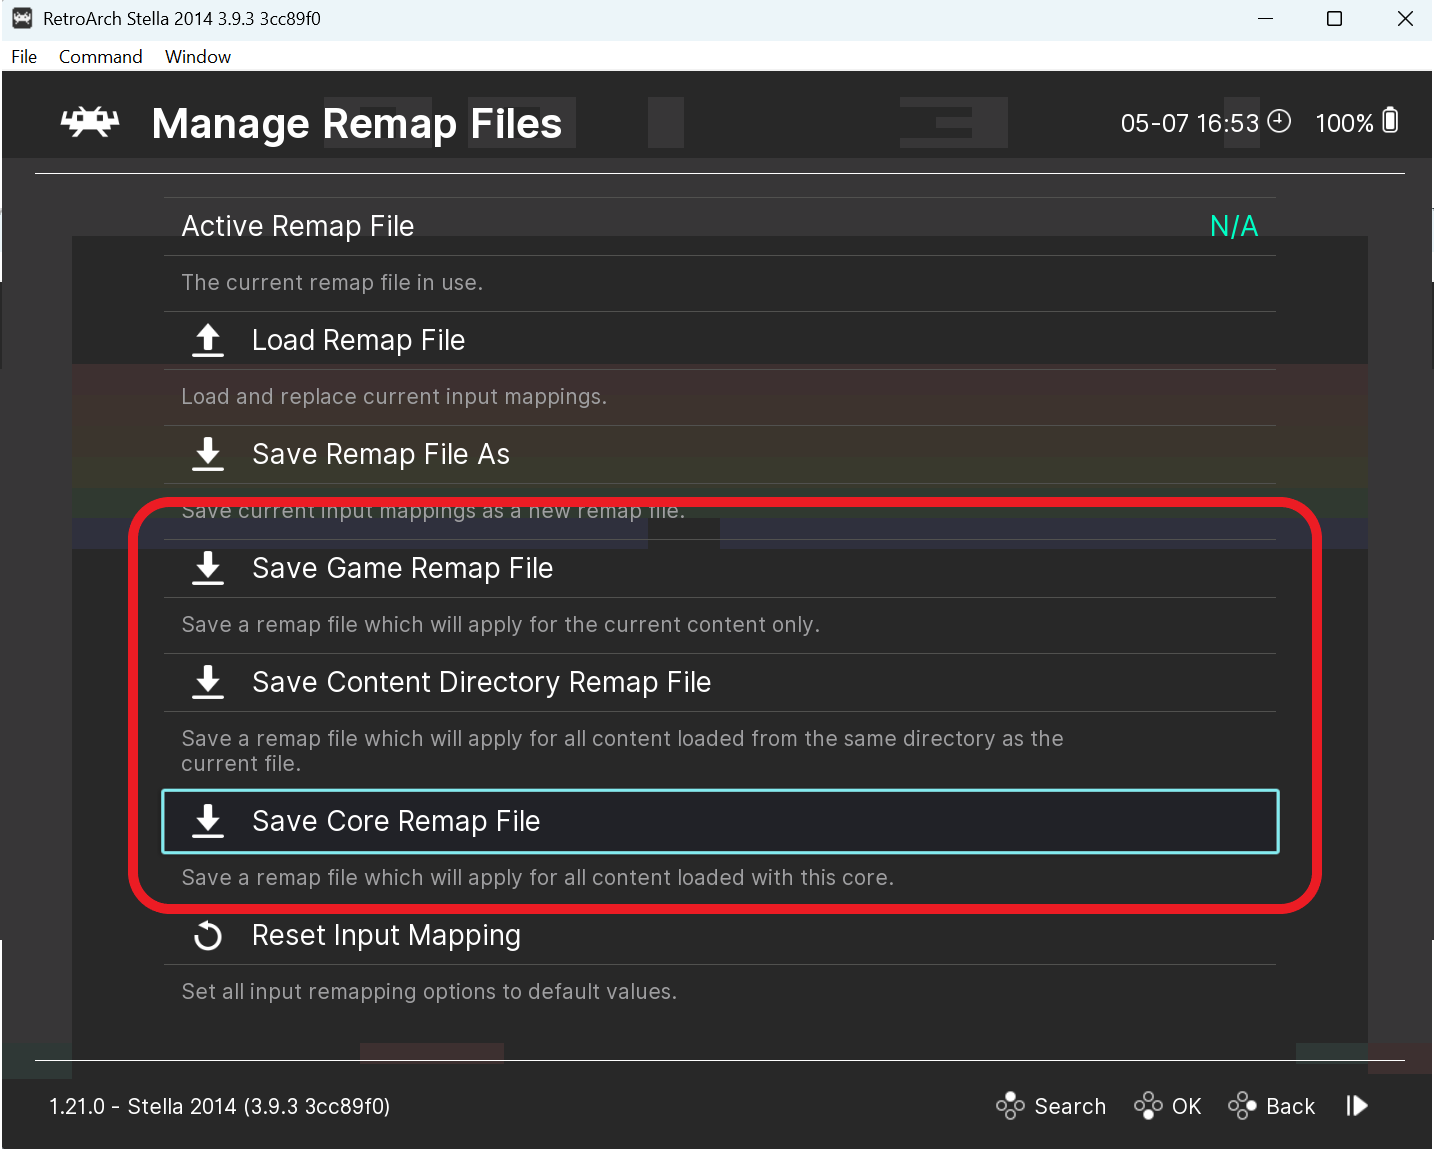
Then choose Save Core Remap File. This applies your paddle setup to every game you load with the Stella 2014 core. (If you’d rather limit it to one game or one folder, the Save Game Remap and Save Content Directory Remap options are right there too.)
6. Troubleshooting & tips
- Nothing detected when you power on the Duo? Make sure you started RetroArch first, then powered the adapter. Try toggling it off and on.
- Both players move together / Player 2 does nothing? Check that Port 1 =
PS3 Controller (1)and Port 2 =PS3 Controller (2)— not both on (1). - A and B feel reversed? The colors can differ between units. Map by button number: B =
Button 0, A =Button 1. - Paddles jump around or only one player works? Confirm you’re on the Stella 2014 core (not regular Stella), that Device Type = Paddles (Stelladaptor), and that Analog to Digital Type = None.
- Using paddles? Keep any mouse device on standby/off so it doesn’t interfere.
7. Quick reference tables
Port 1 button binds (Settings → Input → RetroPad Binds)
| RetroArch button | Value | Color (may vary) |
|---|---|---|
| B Button | Button 0 |
Red |
| A Button | Button 1 |
Green |
| Y Button | Button 2 |
Blue |
| X Button | Button 3 |
Yellow |
| Select | Button 9 |
White |
| Start | Button 8 |
Black |
| Left Analog Y- / Y+ (Up/Down) | Axis -1 / Axis +1 |
Joystick |
| Left Analog X- / X+ (Left/Right) | Axis -0 / Axis +0 |
Joystick |
Paddle mapping (Stella 2014, Device Type = Paddles)
| Frontend port | Fire buttons | Paddle dials (Left Analog) | Players |
|---|---|---|---|
| Port 1 | B = P1 Fire, A = P2 Fire | X = P1, Y = P2 | Players 1 & 2 |
| Port 2 | B = P3 Fire, A = P4 Fire | X = P3, Y = P4 | Players 3 & 4 |
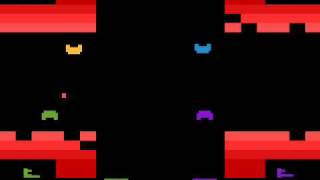
That’s it — your Atari joysticks and paddles should now play beautifully in RetroArch. Load up Breakout or Warlords and enjoy the classics the way they were meant to be played.